注:抓包工具:青花瓷
1.配置fiddler
2.移动端安装fiddler证书
3.配置手机的网络
    - 给手机设置一个代理IP:port
a. Fiddler设置
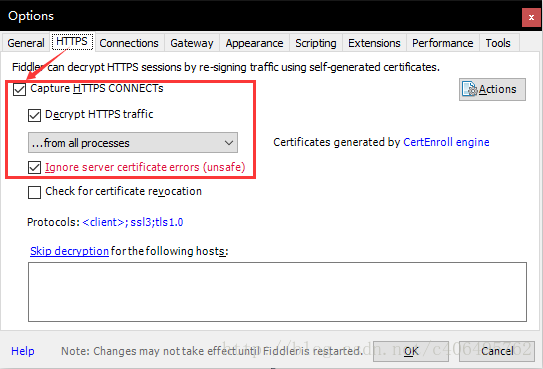
打开Fiddler软件,打开工具的设置。(Fiddler软件菜单栏:Tools->Options)
在HTTPS中设置如下:
在Connections中设置如下,这里使用默认8888端口,当然也可以自己更改,但是注意不要与已经使用的端口冲突:
Allow remote computers to connect:允许别的机器把请求发送到fiddler上来

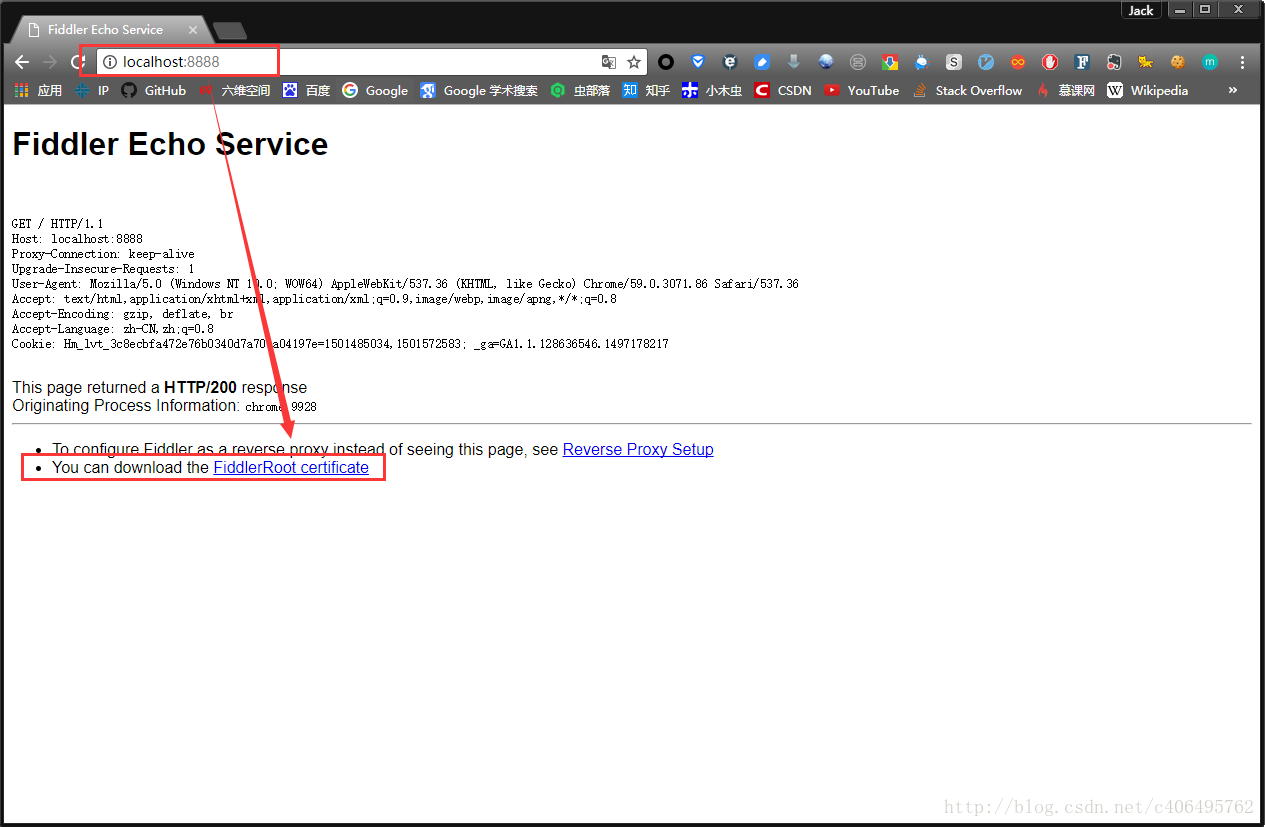
b. 安全证书下载
在电脑浏览器中输入地址:http://localhost:8888/,点击FiddlerRoot certificate,下载安全证书:
也可以
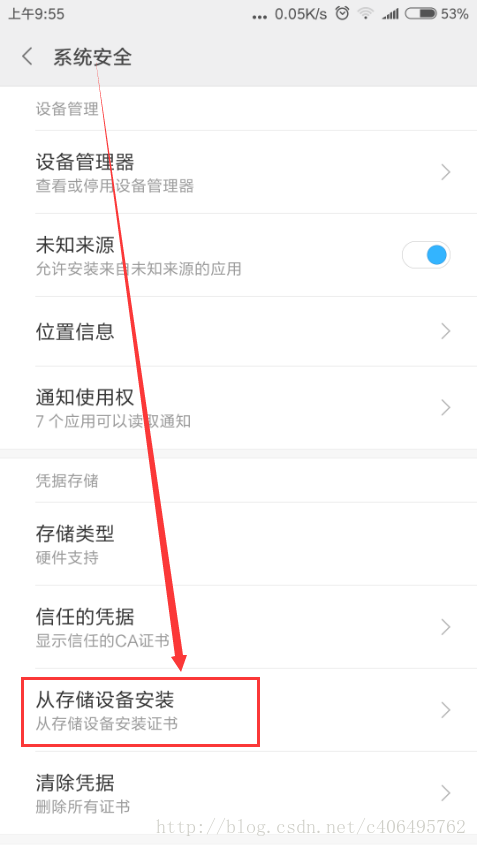
c. 安全证书安装(证书一定要安装且信任)
证书是需要在手机上进行安装的,这样在电脑Fiddler软件抓包的时候,手机使用电脑的网卡上网才不会报错。
Android手机安装:把证书放入手机的内置或外置存储卡上,然后通过手机的”系统安全-》从存储设备安装”菜单安装证书。
然后找到拷贝的FiddlerRoot.cer进行安装即可。安装好之后,可以在信任的凭证中找到我们已经安装好的安全证书。
苹果手机安装:
– 保证手机网络和fiddler所在机器网络是同一个网段下的
– 在safari中访问http://fiddle机器ip:fiddler端口,进行证书下载。然后进行安装证书操作。
– 在手机中的设置-》通用-》关于本机-》证书信任设置-》开启fiddler证书信任
d. 局域网设置
想要使用Fiddler进行手机抓包,首先要确保手机和电脑的网络在一个内网中,可以使用让电脑和手机都连接同一个路由器。当然,也可以让电脑开放WIFI热点,手机连入。这里,我使用的方法是,让手机和电脑同时连入一个路由器中。最后,让手机使用电脑的代理IP进行上网。 在手机上,点击连接的WIFI进行网络修改,添加代理。进行手动设置,ip和端口号都是fiddler机器的ip和fiddler上设置的端口号。
e. Fiddler手机抓包测试
上述步骤都设置完成之后,用手机浏览器打开百度首页,我们就可以顺利抓包了
scrapy框架
(1)环境安装
linux:
    pip install scrapy
windows:
    有whell才能下载下载twisted框架: pips install whell
    下载twisted框架(处理并发相关操作) : http://www.lfd.uci.edu/~gohlke/pythonlibs/#twisted
    进入下载目录,执行: pip3 install Twisted-17.1.0-cp35-cp35m-win_amd64.whl
    pip3 install pywin32
    pip3 install scrapy
(2)新建一个项目
创建一个工程
scrapy startproject 工程名称
此时生成的工程目录


创建一个爬虫文件
注:要保证配置文件创建在当前工程目录下
cd firstblood #在工程目录下创建爬虫文件 会在apiders中出现
scrapy genspider first www.xxx.com #first代表爬虫文件的名称,www.xxx.com代表起始url
在first.py爬虫文件中


执行爬虫文件
scrapy crawl first
scrapy crawl first --nolog (不打印日志)
robots反爬机制的处理
被robots反爬机制拦截的反应


处理方式(在配置文件中修改此条为False)


User-Agent伪装反爬机制的处理
处理方式(在配置文件中修改此条)


数据解析
xpath表达式的使用以及获取Selector对象中的date中的值的两种方式
class FirstSpider(scrapy.Spider):
    name = 'first'
    # allowed_domains = ['www.xxx.com'] #在该文件中,只能爬取这个域名之下的url,通常注释掉这一句
    start_urls = ['https://www.qiushibaike.com/text/']
    def parse(self, response):
        div_list=response.xpath('//div[@id="content-left"]/div')
        for div in div_list:
            #得到的div是Selector类型的
            title=div.xpath('./div/a[2]/h2/text()')[0].extract() #将Selector对象中的date中的值
            title = div.xpath('./div/a[2]/h2/text()').extract_first() #直接得到列表中第0个元素
            print(title)
持久化存储
1.基于终端指令的持久化存储(只能将path的返回值存到本地的文本中)
可以通过将终端指令的形式将parse方法的返回值中存储的数据进行本地磁盘的持久化存储
class FirstSpider(scrapy.Spider):
    name = 'first'
    start_urls = ['https://www.qiushibaike.com/text/']
    def parse(self, response)
        div_list=response.xpath('//div[@id="content-left"]/div')
        all_data=[]
        dic={}
        for div in div_list:
            #得到的div是Selector类型的
            content=div.xpath('./a/div/span/text()').extract_first()
            title=div.xpath('./div/a[2]/h2/text()').extract_first()
            dic={
                "title":title,
                "content":content
            }
            all_data.append(dic)
        print(all_data)
        return all_data
终端指令
scrapy crawl first -o qiubai.csv
注:限制文件存储的格式,只能是json,jsonlines,jl,csv,xml,marshal,pickle格式的文件
2.基于管道的持久化存储
新建工程
scrapy startproject bosspro
cd bosspro
创建爬虫文件
scrapy genspider boss www.baidu.com
修改两种反爬机制

class BossSpider(scrapy.Spider):
name = 'boss'
#allowed_domains = ['www.baidu.com']
start_urls = ['https://www.zhipin.com/job_detail/?query=python爬虫&scity=101010100&industry=&position=']
def parse(self, response):
li_list=response.xpath('//*[@id="main"]/div/div[3]/ul/li')
for li in li_list:
name=li.xpath('./div/div/h3/a/div/text()').extract_first()
salary=li.xpath('./div/div/h3/a/span/text()').extract_first()
管道的使用
在items.py中
import scrapy
class BossproItem(scrapy.Item):
    # define the fields for your item here like:
    # name = scrapy.Field()
    name = scrapy.Field() # 1.将爬虫文件中每一个要提交给管道的数据封装成这个类下的一个属性
    salary = scrapy.Field(
在boss.py爬虫文件中
import scrapy
from bosspro.items import BossproItem #2.导入item中的类
class BossSpider(scrapy.Spider):
name = 'boss'
#allowed_domains = ['www.baidu.com']
start_urls = ['https://www.zhipin.com/job_detail/?query=python爬虫&scity=101010100&industry=&position=']
def parse(self, response):
li_list=response.xpath('//*[@id="main"]/div/div[3]/ul/li')
for li in li_list:
name=li.xpath('./div/div/h3/a/div/text()').extract_first()
salary=li.xpath('./div/div/h3/a/span/text()').extract_first()
item=BossproItem() #3.实例化一盒item对象
item['name']=name #4.将解析到的数据存储到item对象中
item['salary']=salary
yield item #5.将item对象提交给管道
在pipelines.py管道文件中
#此文件需要接受爬虫文件提交过来的数据,并对数据进行持久化存储(IO)
class BossproPipeline(object):
    #爬虫文件每提交一次,该方法执行一次
    def process_item(self, item, spider):
        print(item['name'])
        print(item['salary']) #6.在process_item函数中进行数据的持久化存储
        return item
在settings.py配置文件中
#7.在配置文件中开启管道
ITEM_PIPELINES = {
   'bosspro.pipelines.BossproPipeline': 300, #300表示的是优先级,数值越小优先级越高
}
#pipelines中声明的管道类都要在此处开启
数据的持久化存储(本地,mysql,redis)
#将数据保存到本地
class BossproPipeline(object):
f=None
# open_sipder只会在开始爬虫时执行一次
def open_spider(self,spider): #此处的spider是BossSpider类的一个实例对象
print("开始爬虫!")
self.f= open('./job.txt','w',encoding='utf-8')
def process_item(self, item, spider):
self.f.write(item['name']+':'+item['salary']+"\n")
return item #如果有其他的管道,process_item函数一定要有返回值
#close_sipder只会在结束爬虫时执行一次
def close_spider(self,spider):
print("结束爬虫!")
self.f.close()
#将数据保存到mysql
import pymysql
class Bosspro_mysql_Pipeline(object):
conn=None #连接对象
cursor=None #游标对象
def open_spider(self,spider):
self.conn=pymysql.Connect(host='127.0.0.1',port=3306,user='root',password='',db='pachong')
print("开始爬虫")
print(self.conn)
def process_item(self, item, spider):
self.cursor=self.conn.cursor()
sql='insert into boss values("%s","%s")' % (item["name"],item["salary"])
try:
self.cursor.execute(sql)
self.conn.commit()
print(sql)
except Exception as e:
print(e)
self.conn.rollback() #事务回滚
return item
def close_spider(self,spider):
self.cursor.close()
self.conn.close()
print('结束爬虫')
#将数据保存到redis
from redis import Redis
class Bosspro_redis_Pipeline(object):
conn=None
def open_spider(self,spider):
self.conn=Redis(host='127.0.0.1',port=6380)
print("开始爬虫了")
print(self.conn)
def process_item(self, item, spider):
dic={
"name":item["name"],
"title":item["salary"]
}
self.conn.lpush('Info',dic)
def close_spider(self,spider):
print('结束爬虫了')
注:开启线程
在配置文件中修改CONCURRENT_REQUESTS = 32即可